As the article about Snow seems to be extremely popular, I
thought I’d make a follow up.
The prior article is here: a simple recipe for making snow
bases for Warhammer. It’s a nice read, some good tips, and processes. It’s a
tutorial. Obviously,

The snow mix that I swear by is simply Bicarbonate of Soda, PVA Glue, and Water. Nice and easy and cheap!
The tutorial covers how to mix and apply but it is brief in its description, it doesn’t address some the factors that
I have finessed with this technique lately. So on to Part 2!
Covering feet
Feet are where I devote the least of my time when painting
models. And this is entirely due to the fact that I know that the feet of the
model are likely to be sunk in at least 1 cm of snow.

Adding the snow mix to bases is generally a case of going
around the edges of the feet, and then prodding inwards, sometimes you get over spill that covers a boot, generally they are bare enough to see the top of
the shoes only.
This also helps when you have items on the model that you
want to cover up or omit. To get the pose on this Sergeant right, I had to lop his foot off. This was covered by the snow.


In this model, the chainaxe attached to the gangly arms was
large, too large almost. To cover this
up I needed to appear as if it was thunked in the snow at rest.

If you
extrapolate where the blade actually would emerge, you can see that this goes
far deeper into the snow. Does it affect the overall feel of the model? Not
really.

Depth
Infantry are best for representing depth because they bring
their snow with them on their base, tanks don’t. A great diorama would allow me
to show this, like this excellent example.
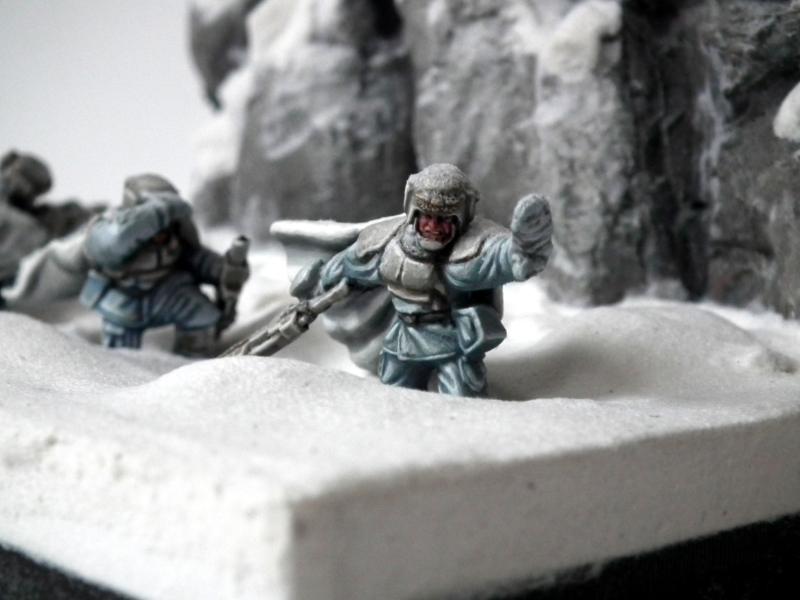
In a gaming context, a deep base just mixes the feel of the
squad up more, and variance is key.

Piling the snow in deeper, albeit as flat a
surface nicely represents how the figure would wade through something
regardless of depth. Burying items in the snow also adds to this.

Movement
When moving through the snow, trails should be added a
little after the Snow mix has settled. This can be done using the poor abused
brush that you’ve spooned the snow on with already. Or instead I use a bit of
sprue as the movement is a little more lifelike.

Dependent on the Snow mix these indentations can be soft or
hard.
Drag for tank trails.

In addition to this, every foot that is raised from the snow
should always have Snow across the sole. Whether mechanical or organic, it
should always show the adhesion of the Snow on the sole at least.

Marrying the figure with the base
Moving through snow means sticking. Snow travels up the
legs. Soft army fatigues would always carry the snow with them, mechanical components less so.
To represent this, dab or brush extra portions on the lower
legs and thighs of the miniatures to show the effort of movement, and to merge
portions of the model with its base. Here are 2 squads. One without the blending and one
with.


Have a favorite? Me too.
Watering that snow mix down may remove it as its in such
small volumes, but some will remain. And less is best.
On to vehicles.

This is a new one that I wish I’d thought of sooner. It’s snowing.
A fast moving Leman Russ is moving through it; expect much snow across it?
Bursting through buildings, driving and shaking a lot?
Lots of ‘travel’ snow, i.e. treads and the front of the
vehicle. When Snow gathers it does so just past the direction of travel to the
rear, when barging through things the front of ploughs and tops of tracks are
always clear as well.

Now how about a Wyvern? Static. Sitting in one place? Being
snowed on? Yes, lots.

To represent this, slap it on the Wyvern in (uncomfortably
heavy) layers and layers. Yes it covers your work. Yes it sucks to waste time
by covering it. Does it look better? Yes. It looks realistic.

Even the heavy bolter is unused in an artillery vehicle. In
the real world these guys would even have added tarpaulins to further
camouflage the thing.
Mechanical snow movement
Another late idea that would have been better sooner. Turrets move, and they move the snow with
them. Shuffle the snow away from the turrets by practically moving the turret
around and seeing where the snow would be moved from, Copy.

Notice the circle around the turret? Here?

An error on my part on the tank below was showing the blood trail running
the wrong way. Tracks move towards the front of the tank. This trail should go
in reverse in fact. To cover up, I'll need to add one long trail instead!

Vehicle heat vents should always be free, anything that will
get hot should have no covering of snow whatsoever, and when I get my hands on
some water effects I’ll add melting around them as well

Plasma even more so.


Slap on/Brush off
With the early attempts at snow, I was far too polite and
dainty.
See this Superheavy.

See how little detail is covered by the snow
raining upon it. Gathered in little places. Likely? No. This should be how much
snow is on a tank of that approximate size. You must be bold.
SLAP IT ON! Don’t be afraid that you’ll lose your work
underneath because you won’t.
When dry, PVA and Bicarb come away really easily with an old
brush. A flick and its gone. If you want to soften that effect use a lot of
water and gradually reduce the covering until you get the desired effect.

Bicarbonate Choices
This can make all the difference in the world and its all
about grain-size. I have no idea of the complexities of what makes up bicarb, I
don’t intend to. However, I do know that there are very grainy brands, and very
fine brands. Pick which works for you.
I prefer fine, as I find that its scale matches 28mm better.
For slush and watery snow, large grain size is just more realistic.
Varnish
This is entirely personal choice. When I have too much fine
snow on the model I generally blow as much away, and then spray with purity
seal to hold the remaining snow mix in place.
Hairspray works fine for this too and is far cheaper, but
lacks the protective qualities of Purity seal too. When I get the opportunity I
will be trying water effects on the snow too to see what enhancements it
brings.
Water run
When you add a lot of water to the mix, the Bicarb
components can pool in seams, and can spread across the miniature in unlovely
splodges, these I wipe away when dry. Sometimes vertically this looks nice, in
a flat plane it looks terrible.

Leftovers
You will always get leftovers of the Snow mix. To get the
mix right you will always be adding more of one of the ingredients as you cant
remove it. That means excess!

Rather than getting rid of it completely, I stick any
remaining on scenery items.

This has been on my desk for around three months, and I have
been periodically adding more and more snow to more and more areas as I go. As
its bunched up it looks fine. Better this than throwing away!

I hope some of those extra tips have helped, as I find
working with this stuff to be a constantly evolving process.
Fantastic work on this tutorial Mark. You use snow in a very convincing method. I imagine you could combine this with some ice tutorials, to really step up models in a diorama or scene!
ReplyDeleteThat's the next step for me, get some water effects and make some mess. Nothing like a bit of ice!
DeleteWhat I like to ask is whats the best soda product to use?
ReplyDeleteHi DeviantLemming,
DeleteIt can be a matter of preference for what snow effect you want. Because my approach to snow is closer to deep, clumped snow, that binds on clothing and tracks I’ve found the product that matches best is often the Supermarkets own branded Bicarbonate of Soda, as the grain size is often very small, allowing for ‘size-appropriate clumpage’.
The product I’ve personally avoided is the Dr Oeker brand, as the grain size is fairly large.
If you have any already in the cupboard, test it and then try another brand, I got lucky first time around but don't commit without testing first?
Great tutorial mate. I have a couple of questions though. How long does it take before it's completely dry?
ReplyDeleteAnd does the shine go away after it dries? Because of the water there's a shiny look to it in my case. Is that because I used too much water or is it normal?
Yanick if you can share some pictures but no unless you've used a lot of water it should be a matte texture. What glue did you use and when you mixed the snow were peaks standing by themselves like thick icing or was it closer to wet toothpaste?
DeleteEmail address is smudga51 'at' Gmail. Com, let's discuss